
Saturday, October 31, 2009
A Monster Who Swallowed a Fly
I was in charge of Claire's Halloween Party in Kindergarten, so for the craft/activity, we made a monster face, that you can sing, "There was a blue monster who swallowed a fly."
I cut out the face out of that foamy paper stuff and glued it to a stick. I made one of these for each of the kids and then I cut out a bunch of different shapes for hair, eyes, nose, and ears- all in different colors and shapes, so the kids could build their own kind of monster (kinda like mr. potato head). These were all cut out in the sparkly foamy paper, that had a sticky back. So no glue, no drama, no mess- easy-peasy, and it turned out pretty cute. Here is the one Claire made:

And then once everyone made their monsters, we pulled the paper through the mouth to sing the song. The kids liked it and had fun.
Friday, October 30, 2009
Finally Starting My Christmas Decorations
I'm starting with my Christmas quilt, using my figgy pudding material. Here is the beginning. I'm actually thrilled with the way that it is coming together.


If I have enough left over fabric, I'd like to make a table running with the Christmas trees. Maybe add a border with some sort of pieced squares. Oh how I wish I had more time to sew!
Easton's Block Revisited

I used the remaining scraps to try making another block, without the minki this time. It went together much better, although if I could make it again, I would iron the block befoer stuffing it. I also made a "taggie blanket" with more scraps.

Mike's Trick or Treat Bag


Mike wanted to be a "happy scary monster" for Halloween, so this is the bag that I came up with. I found the picture of a monster on the intenet, printed it off, blew it up, and used it as a pattern for my applique. Mike loved it, even though 2 days before Halloween he told me he changed his mind and he wanted to be a dinosaur. Argh!
Saturday, October 24, 2009
Quilting re-done
After spending a couple hours unpicking my previous quilt job and re-doing it in boring straight lines, my table topper is done. Even though I used boring straight lines, it still turned out very nice, much nicer than before. It lies flat, and it really looks good. I just wish I wasn't too chicken to try the curly-Q's and pumpkins again. I think my biggest mistake before was not putting the safety pins close enough, and I not turning off the feed dogs.

p.s. At least I didn't turn it into shorts!!
p.s. At least I didn't turn it into shorts!!
Thursday, October 22, 2009
Abby's Halloween Costume
I'm almost embarrassed to post this, after Brooke's darling creation.
Originally, I was going to have the tutu with a poodle skirt over it (see below), but it looked too much like a red mushroom, so I scrapped that idea and just sewed a few dots on the tutu. She'll be wearing a black onsie and black tights under this. I'm also toying with the idea of removing the black spots from the tutu and just leaving it as plain red. What do you think?


The poodle skirt that I don't think I'll use.

She'll be wearing two pigtails (like antennas) with these two flower barrettes.


PS. I don't know what is wrong with my camera, but the pictures turned out funny.
PSS I know my spelling is atrocious (see!), but I can't figure out how to spell check with this new blogger format. Any help?
Tuesday, October 20, 2009
Ladybug Wings
I had a lot of fun making this costume. I love to make the felt dresses, as they are easy and don't require finishing the edges (my kind of sewing). The wings turned out nice, without any major hitches either. Stress free sewing (which isn't quite the case with Claire's fairy costume I am making). Here is a sneak preview. It isn't all the way finished, because Morgan refuses to let me put it on her, or even hold it up to her. So we may have some problems come Halloween Night.


 {my favorite part of the costume- when she spreads her arms, the wings spread apart and underneath are her shimmery ladybug wings. If only she would put the darn thing on.}


 {my favorite part of the costume- when she spreads her arms, the wings spread apart and underneath are her shimmery ladybug wings. If only she would put the darn thing on.}
Felt Monogram
I was perusing the links to the left, and I found this project, which I think is so cute. I want to do something like this for Claire and Morgan, and even for little Luke. I made sparkly glitter letters that spell JOY that I put up for Christmas a couple of years ago (which I love, by the way) and I think these felt letters would be fun to put up for autumn decorations, like the word FALL.


Saturday, October 17, 2009
A blanket for Easton
Last winter, Elizabeth showed me this quilt that she wanted to make (no, this isn't the one that I made for her, I wish i could come up with something so cute). She told me that she had hunted down most of the exact fabric and was planning on making this. So I hunted down the safari fabric and made . . . .


this not-nearly-as-cute blanket and toy block.

But it is soft and coordinates, which is what I was going for. I found the tutorial for the block here. Minki is not easy to work with, or so I discovered. It stretches and it is very slippery. And I will not be using stretchy fabrics for the blocks anymore because when you stuff it, it stretches and stretches so that it looks more like a ball than a block. I'm going to send the block anyway and maybe their dog will find a use for it. :) The block really looks that bad. Oh well.
To make this blanket, I sewed the rights sides together, flipped it right side out, top stitched around the edges (which also closes the opening) and quilted a square in the middle so that it wouldn't pull apart. It would have been super easy but for the problems with the minki. But I learned something new as I usually do.


Mike's Bedroom
I'm not much into decorating, mainly because I don't know what I'm doing and I don't like spending money on it. However, I used scraps that mom sent me to make these wall hangings for Mike's bedroom (you can't tell, but they are the scraps from the quilt on his bed that Mom made when he was born). The picture frames were $1.50 at Ikea (they are plastic and cardboard). I figured while I was at it, I might was well show you the rest of his room. Like I said, I'm not very good at decorating (but at least a lot of it is educational). All of our furniture and bedding in this room are hand me downs from Tom's parents (yes I'm very spoiled), so that is why Mike has a king sized bed. As you will see, there are plenty of bare spaces on the walls for a charcoal sailboat or an oil painting (BIG FAT HINT, HINT, HINT Dad and Monica!!!!)


The quilt Mom made for Mike when he was born. Its one of my favorites (of course all of Mom's are one of my favorites).

I think he is pointing out earth

Friday, October 16, 2009
Halloween Phantom
You probably live in a cooler neighborhood than me. Well, not probably. You for sure live in a cooler neighborhood than I do, but just in case no one has started a Halloween Phantom yet, here is a poem that I wrote a couple years ago (well, I kinda wrote it stealing lines from other poems). If you have never Phantomed (which includes leaving a plate of goodies on a porch, running the doorbell, and running like heck so you don't get caught), it is such an adrenaline high. Both you and your kids will love it!
 And it always reminds me of when we first moved into First Ward and we got phantomed every night. I knew I would love that ward!
And now for a cookie quandry:
I wanted to make pumpkin cookies to decorate with gumdrops, candy corns, and red hots (like when we were little). So what is the best pumpkin recipe to make that with? I am not much of a pumpkin cookie connoisseur, so I need some advice.
Thursday, October 15, 2009
Help Me!
What did I do wrong?? I have been tryin to make a table runner, and it all went well until I got to the quilting part. I bought the least lofty batting I could find, I safety pinned it together at the counter, putting safety pins every 5 inches or so. I even practiced quilting pumpkin shapes and was somewhat comfortable with doing them. But it turned out like garbage. The material on top is too bunchy and there are parts that stick up (check out the bottom picture).


I already started unpicking it because I want to redo it. What do I need to do differently? What did I do wrong (besides not sending it up to mom to quilt)?
Sunday, October 11, 2009
Thanksgiving table setting
I love this. Especially the place mat circle things. There is a tutorial at Moda Bake Shop. 
And by the way, remember in my previous post I said that the abundantly blessed quilt was made up at the quilt store with 2 different types of fabric? Well, the fabric recommended in this tutorial was one of the fabrics, and it was so pretty.
And by the way, remember in my previous post I said that the abundantly blessed quilt was made up at the quilt store with 2 different types of fabric? Well, the fabric recommended in this tutorial was one of the fabrics, and it was so pretty.


Saturday, October 10, 2009
Abudantly Blessed
Today I went to the Quilters Haven and saw 2 of these quilts on display, made with different fabric, both super cute. I had to ask the lady for the pattern because they were saving them for people who were going to take the class. Luckily, she let me purchase one. Unluckily, it was way more than I like to spend for an 8 1/2 x 11 folded piece of paper.
 Quilt is by Cotton Way, and really, it is a table topper.
Quilt is by Cotton Way, and really, it is a table topper.Friday, October 9, 2009
Abby's Quilt

I found this quilt from Crazy Old Ladies and love the pattern (not so much the fabrics). I was going to try to just come up with the pattern myself, but I found it for $5 and figured it was worth the money for the time and effort it would save me to figure out dimensions and sketch pictures and so forth. Any who. I can't decide on fabrics. My quilt stores don't have anything that I'm particularly loving right now, so if you find anything that you think would go well with this, write down the collection and designer for me. Monica found this fabulous collection "Love U" and I want to use some of them (especially the sunshine trees, polka dots and owls which would all be perfect), but I need more. Would it look okay in solids? How about polka dots? Or should I try to find florals? What colors? All suggestions are welcome.
Thursday, October 8, 2009
Kissed Pin-Tuck
I am currently trying to spruce up my bedding without spending a lot of money. I have a white quilt as the base and nothing else really. So I decided to make a throw quilt that mimics a duvet cover to place across the bottom of the bed. I love this look from west elm. . .

. . but I don't want to pay that much. So I found a tutorial on line for this "kissed pintuck" look from Martha Stewart. I purchased two ice-blue sheet sets from Marshalls and I am using the two flat sheets to make the throw. I have already started making the kissed pleats and they look fantastic! It is really easy.
I will use the bottom, fitted sheets to make some throw pillows out of and use a variety of stitches, which I have found tutorials for: the pin-tuck, the honey-comb, and more of the kissed pintuck.
I'll post pictures when I am done.
Wednesday, October 7, 2009
Wall Cards
I finally got around to going through the model home in our neighborhood. I just loved the cute flower art they had in the little girls room. I found out that they just took these alphabet wall cards from EEboo and put them in a frame with a mat.

I know they look small here, but each card was about 8 x 10. I think it would be fun to spell out the girls name. Too bad my girls both have repeating letters, and long names. So you would need a short name with no repeating letters for my plan to work. Or you could just hang up whatever flowers you like best. They also have other types of alphabet wall cards with animals, trucks, etc.
Tuesday, October 6, 2009
Loving This Quilt


Friday, October 2, 2009
Crayon Roll
I have realized these last few weeks that my diaper bag just isn't big enough. By the time I put a few diapers and wipes in it, a spare change of clothes, a toy, and a baggie of cheerios, it is overflowing and almost unmangeable. So, the solution is: I definately need to make a birdie sling purse and matching crayon roll. I found a great tutorial for crayon rolls at Skip To My Lou.
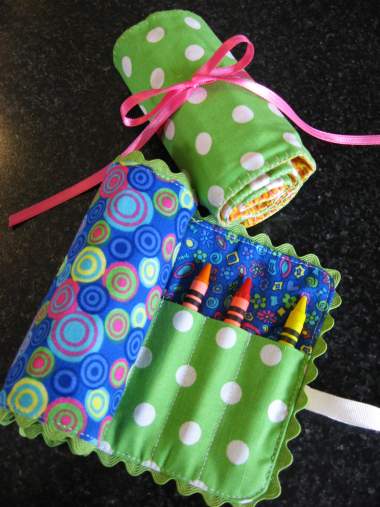

I think it is a great idea. No more crayon boxes that are held together by scotch tape that really doesn't stick so well and a flap that doesn't want to stay tucked in so that all the crayons fall out of the bottom. Been there, done that, let's try the crayon roll. And I definitely love the ric rac.
Thanks for sending the Birdie Sling pattern Michelle. I found the pattern yesterday and I am a little intimidated by it. I might have to call you for clarifications. Wish me luck.
Paper Decorations


Subscribe to:
Posts (Atom)